 |||
|||
This post talks about building and deploying Windows phone apps using Visual Studio team services. This is part 3 of series of posts. To see how to build iOS & Android apps using VSTS, please see part 1 and 2 of this series.
| Variable Name | Variable Value |
|---|---|
| system.debug | false |
| BuildConfiguration | release |
| BuildPlatform | any cpu |
| Field Name | Field Value |
|---|---|
| Path to Solution | Locate the Windows only solution that has the Windows project and the shared code. |
| Path to Nuget | Locate path of any custom nuget config files. See part 1 for more details |
| Installation Type | restore |
| Field Name | Field Value |
|---|---|
| Solution | Path to WinPhone.csproj |
| MSBuild Arguments | /p:SolutionDir=$(Build.SourcesDirectory) |
| Configuration | $(BuildConfiguration) |
| Clean | true |
| Visual Studio Version | Visual Studio 2015 |
Advanced Tab
| Field Name | Field Value |
|---|---|
| MSBuild Architecture | MSBuild x86 |
| Record Project details | true |
| Field Name | Field Value |
|---|---|
| Project | Path to UnitTests.csproject file |
| Configuration | $(BuildConfiguration) |
Advanced Tab
| Field Name | Field Value |
|---|---|
| MSBuild Version | MSBuild 14.0 |
| MSBuild Architecture | MSBuild x86 |
| Field Name | Field Value |
|---|---|
| Test Assembly | **\bin\$(BuildConfiguration)\*UnitTests*.dll |
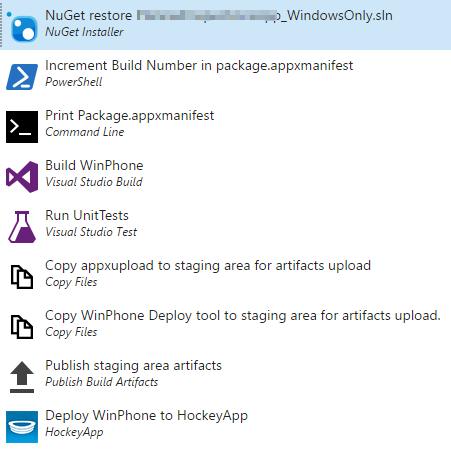
Same as develop branch
| Field Name | Field Value |
|---|---|
| Type | File Path |
| Script Path | A custom powershell script to patch version numbers. Contents below: |
| Arguments | $(Build.BuildNumber) |
Advanced Tab
| Field Name | Field Value |
|---|---|
| Working Folder | Path to the WinPhone.csproj folder |
param([Int32]$newBuildNumber=0)

$majorMinorRegex   = 'Version="\d+.\d+.(?=\d+.\d+)'
$buildNumberRegex  = 'Version="\d+.\d+.([\d+]+)(?=.\d+)'
$finalPatternRegex = 'Version="(.*)'

$inputFile  = 'Package.appxmanifest'
$outputFile = $inputFile

$majorMinorVersion = Select-String -Path $inputFile -pattern $majorMinorRegex -AllMatches | % {$_.Matches} | % {$_.Groups[0].Value}
Write-Host 'Extracted Major Minor String '$majorMinorVersion
(Get-Content $inputFile) -replace $buildNumberRegex, -join($majorMinorVersion, $newBuildNumber) | Set-Content $outputFile
This script takes the build number as an input argument and updates the build number column in Package.appxmanifest
![]()
| Field Name | Field Value |
|---|---|
| Tool | cat |
| Arguments | Path to winphone project directory/Package.appxmanifest |
| Field Name | Field Value |
|---|---|
| Solution | Name of the winphone solution |
| Platform | arm |
| Configuration | Release |
| Clean | true |
| Visual Studio Version | Visual Studio 2015 |
Everything remains as default settings
If your windows phone app uses sqlite to persist data, then the build process gets slightly tricky. We can easily reference the sqlite package from nuget but windows phone 8.1 does not come pre-installed with the sqlite runtime. We have to package in the necessary sqlite runtime files with our win phone build or the app would not run. One way to achieve this is by installing a visual studio extension and then reference the necessary dlls as described here. That all works fine on the developer machine but not on the build server, not without installing Visual studio on the build server, which is not ideal.
An alternate approach is to emulate the SDK folder structure locally in a folder ‘Dependencies’ that lives at the solution level and we check in that folder and its contents to git. The next step is to tell msbuild that this Dependencies folder is a valid location for loading sdk dlls. We do this by adding the following xml in the winphone csproj file (by unloading project and editing).
 <PropertyGroup>
    <SDKReferenceDirectoryRoot>$(SolutionDir)\Dependencies;$(SDKReferenceDirectoryRoot)</SDKReferenceDirectoryRoot>
  </PropertyGroup>
The above xml element can be added after the last existing PropertyGroup xml element in the csproj file.
This is how the structure for the Dependencies folder looks like on my dev machine.
SolutionDir => Dependencies => WindowsPhoneApp => v8.1 => ExtensionSDKs => Microsoft.VCLibs & SQLite.WP81
The folder structure starting from WindowsPhoneApp can be copied to Dependencies folder from the installed SDK location on the dev machine. For example - the location of sdk on my dev machine is at C:Files (x86)SDKs
Also make sure to the following two dependencies are setup correctly in the csproj xml
<ItemGroup>
    <SDKReference Include="Microsoft.VCLibs, Version=12.0">
      <Name>Microsoft Visual C++ 2013 Runtime Package for Windows Phone</Name>
    </SDKReference>
    <SDKReference Include="SQLite.WP81, Version=3.11.0">
      <Name>SQLite for Windows Phone 8.1</Name>
    </SDKReference>
  </ItemGroup>
Doing so will ensure the winphone project can be built locally and on the build server as well.
Same as beta branch
| Field Name | Field Value |
|---|---|
| Source Folder | [Path to WinPhone Folder]/AppPackages |
| Contents | *.appxupload |
| Target Folder | $(build.artifactstagingdirectory) |
Unfortunately there is no direct support for installing windows phone apps from HockeyApp onto a device, so we need to take a different approach for this. We will upload a win phone app deployment tool (part of windows phone sdk) to our staging area. The testers can grab this tool from the build server/staging area and get the appxupload file from HockeyApp and deploy to device via USB. The tool only has 2 files.
On my machine this tool lives under “C:Files (x86)SDKsPhone.1”
These 2 files are zipped up in a folder Dependencies (as mentioned above) and are checked in to the git repo along with the code.
| Field Name | Field Value |
|---|---|
| Source Folder | Dependencies |
| Contents | WinPhone_AppDeployTool.zip |
| Target Folder | $(build.artifactstagingdirectory) |
| Field Name | Field Value |
|---|---|
| Path to Publish | $(build.artifactstagingdirectory) |
| Artifact Name | drop |
| Artifact Type | Server |
| Field Name | Field Value |
|---|---|
| HockeyApp Connection | Choose from Dropdown |
| App ID | the bucket id for the project defined in Hockey App |
| Binary Build Path | $(build.artifactstagingdirectory)\*.appxupload |
| Publish | true |
Everything same as the beta branch, except in the deploy to hockey app step change to the right AppID